Shops: Difference between revisions
No edit summary |
|||
| (3 intermediate revisions by the same user not shown) | |||
| Line 1: | Line 1: | ||
Citizens has | Citizens has built-in support for basic GUI shops. | ||
== Getting Started == | == Getting Started == | ||
| Line 8: | Line 8: | ||
Here you can see the settings screen from left to right: | Here you can see the settings screen from left to right: | ||
[[File:Shop Settings.png| | |||
[[File:Shop Settings.png|frameless]] | |||
You can edit the permission required to view the shop, the shop items, the shop title, whether to open this shop on right click and the type of shop (explained later). | You can edit the permission required to view the shop, the shop items, the shop title, whether to open this shop on right click and the type of shop (explained later). | ||
| Line 14: | Line 15: | ||
After clicking on the edit shop button for example you can see the following screen. Edit the shop title in the anvil menu and click on the paper to change the title! | After clicking on the edit shop button for example you can see the following screen. Edit the shop title in the anvil menu and click on the paper to change the title! | ||
[[File:Edit Shop Screen.png| | [[File:Edit Shop Screen.png|frameless]] | ||
== Editing pages == | == Editing pages == | ||
| Line 21: | Line 22: | ||
In this screen, you can drop an item onto the page slots to put it into the shop. | In this screen, you can drop an item onto the page slots to put it into the shop. | ||
[[File:Edit Shop Items.png| | [[File:Edit Shop Items.png|frameless]] | ||
This will be the item that's displayed in your shop. You can also edit the next page slots by using shift-click. | This will be the item that's displayed in your shop. You can also edit the next page slots by using shift-click. | ||
| Line 28: | Line 29: | ||
Once in the editing item screen, you can set a '''cost''' (on the top left) and a '''result''' (on the top right). Note that a result item must be set or else the item will just sit in the shop looking pretty. | Once in the editing item screen, you can set a '''cost''' (on the top left) and a '''result''' (on the top right). Note that a result item must be set or else the item will just sit in the shop looking pretty. | ||
[[File:Edit Item Screen.png| | |||
[[File:Edit Item Screen.png|frameless]] | |||
There's some buttons at the bottom to edit various things like purchase message, click to confirm, max purchases etc. | There's some buttons at the bottom to edit various things like purchase message, click to confirm, max purchases etc. | ||
| Line 37: | Line 39: | ||
First, I click on the item cost chest button at the top left. | First, I click on the item cost chest button at the top left. | ||
[[File:Item Cost .png| | [[File:Item Cost .png|frameless]] | ||
Just drag and drop an item anywhere in the top screen to set it as a cost. I do the same thing for the item result (3 sticks). You can see the preview of the cost and result by hovering over the icons. | Just drag and drop an item anywhere in the top screen to set it as a cost. I do the same thing for the item result (3 sticks). You can see the preview of the cost and result by hovering over the icons. | ||
[[File:Item Result preview.png| | [[File:Item Result preview.png|frameless]] | ||
[[File:Item Display Preview.png| | [[File:Item Display Preview.png|frameless]] | ||
I also set the shop to show on right click using the following setting. | I also set the shop to show on right click using the following setting. | ||
[[File:Shop Show on right click.png| | [[File:Shop Show on right click.png|frameless]] | ||
Here's the final resulting shop and I can easily trade for some sticks. | Here's the final resulting shop and I can easily trade for some sticks. | ||
[[File:Shop Result 1.png| | [[File:Shop Result 1.png|frameless]] | ||
[[File:Shop Result 2.png| | [[File:Shop Result 2.png|frameless]] | ||
== Changing the shop type == | == Changing the shop type == | ||
| Line 58: | Line 60: | ||
Using the above demo, let's see what the trader shop looks like. First, I set the shop to a trader shop. | Using the above demo, let's see what the trader shop looks like. First, I set the shop to a trader shop. | ||
[[File:Shop type set.png| | [[File:Shop type set.png|frameless]] | ||
Now we can see the final result. | Now we can see the final result. | ||
[[File:Trader shop.png| | [[File:Trader shop.png|frameless]] | ||
Note that the result of the trade is shown as the display item, not the stick result. | Note that the result of the trade is shown as the display item, not the stick result. | ||
== Advanced topics == | == Advanced topics == | ||
Citizens has a <cost> and <result> placeholder that you can put into the display item description to automatically show the cost and result. If you would like to customise this then set a custom description. | |||
There are a lot more advanced topics within the shop GUI. If you would like more info here, please ask on Discord to get it added. | There are a lot more advanced topics within the shop GUI. If you would like more info here, please ask on Discord to get it added. | ||
Latest revision as of 11:58, 2 November 2024
Citizens has built-in support for basic GUI shops.
Getting Started
Type /npc shop edit to open the NPC's shop.
You can also create a named shop by typing /npc shop edit NAMEHERE. Named shops can be shared by any NPC.
You will see basic configuration settings including editing the type of shop from buy to sell to command shops, setting the permission required to view the shop, and whether to open the shop on right click.
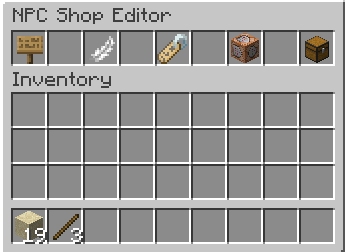
Here you can see the settings screen from left to right:
You can edit the permission required to view the shop, the shop items, the shop title, whether to open this shop on right click and the type of shop (explained later).
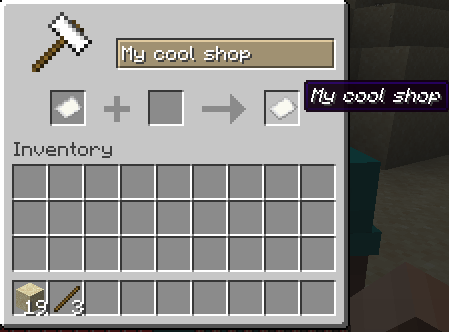
After clicking on the edit shop button for example you can see the following screen. Edit the shop title in the anvil menu and click on the paper to change the title!
Editing pages
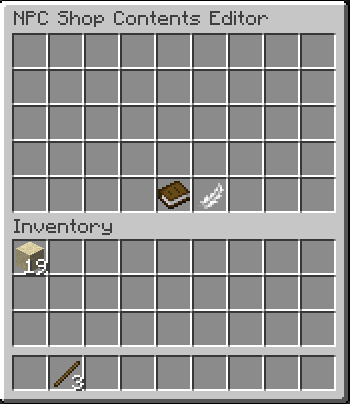
You probably want to create a shop page. Click on the feather icon to start editing individual pages.
In this screen, you can drop an item onto the page slots to put it into the shop.
This will be the item that's displayed in your shop. You can also edit the next page slots by using shift-click.
Editing items
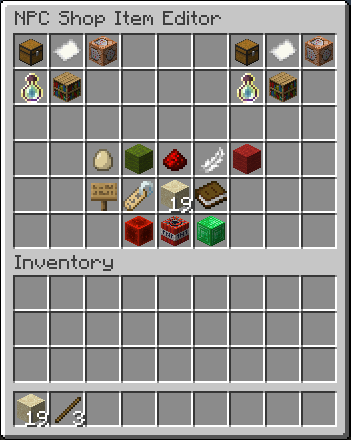
Once in the editing item screen, you can set a cost (on the top left) and a result (on the top right). Note that a result item must be set or else the item will just sit in the shop looking pretty.
There's some buttons at the bottom to edit various things like purchase message, click to confirm, max purchases etc. Please note: the green emerald block must be clicked to save the item when you're done.
Next, let's add a cost and a result. I have some sand and I want to set up a trade from one sand to three sticks.
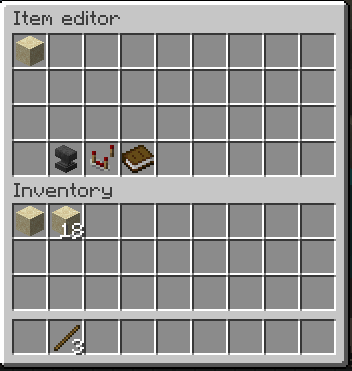
First, I click on the item cost chest button at the top left.
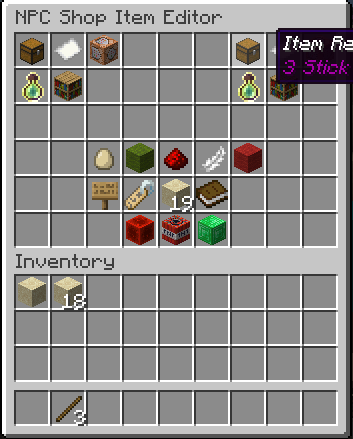
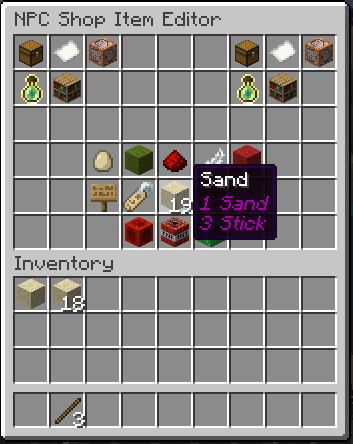
Just drag and drop an item anywhere in the top screen to set it as a cost. I do the same thing for the item result (3 sticks). You can see the preview of the cost and result by hovering over the icons.
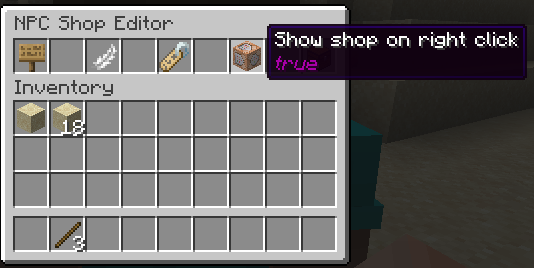
I also set the shop to show on right click using the following setting.
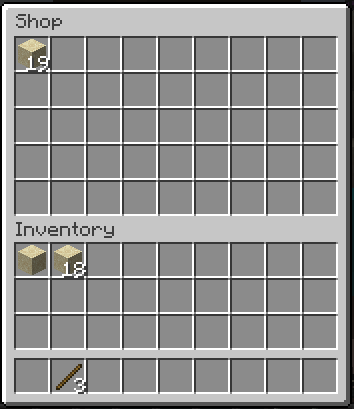
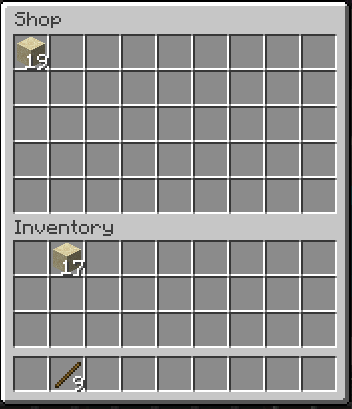
Here's the final resulting shop and I can easily trade for some sticks.
Changing the shop type
You can change the shop type in the shop settings. Currently, this lets you change the number of chest rows your shop will show and also make it into a trader shop i.e. display as a villager trader GUI.
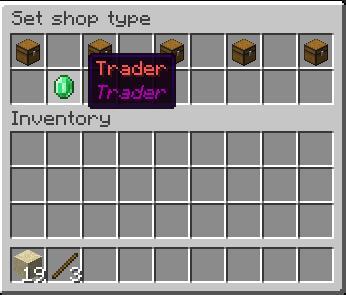
Using the above demo, let's see what the trader shop looks like. First, I set the shop to a trader shop.
Now we can see the final result.
Note that the result of the trade is shown as the display item, not the stick result.
Advanced topics
Citizens has a <cost> and <result> placeholder that you can put into the display item description to automatically show the cost and result. If you would like to customise this then set a custom description.
There are a lot more advanced topics within the shop GUI. If you would like more info here, please ask on Discord to get it added.
